Production
Production timeline
Beginning shots and test shots:
1. Adjusting to using a track
Setting up the track took some time, as I had to place the poles together, and place the moving track item onto the poles, before finally setting up the tripod on the track. I first filmed some test shots and familiarised myself with the track and its setup before doing some trial runs. The test shots were successful and I mainly did test shots in a night-time setting and seeing how it differed from the morning/natural light setting. Afterwards, I filmed in a brighter setting and started actual filming.


 |
| polaroid behind the scenes of testing |
2. Test shots and trial runs
The test shots and trial runs mainly were shots of the very beginning of my film, in which there's a tracking shot of the hallway and a tilt up to the main character sitting in their chair, whilst sewing an item of clothing. Majority of the trial runs were successful, with some needing to either be slower or faster in terms of the track, and the tilt shot needed to be quicker or in a match-on-action sequence. The trial runs were also filmed with a dark hallway and a light source in front, to a lightened hallway and no light source in the front -- these shots differed very well, and helped me to understand how I would then actually film on the track. I also used the track to do 2 different effects, one was the dolly zoom, in which the camera zooms in whilst moving backwards, and the other was a character moving forwards towards the camera whilst it moves backwards.
^Test tracking shot in dark lighting
3. Actual production
1. Home setting production
When I started actually producing my film, I had to reposition the track to fit inside the doorway - this was a bit hard to do, as the tripod kept on bashing into the opening of the doorway, therefore it was incredibly hard to properly fit the whole track inside, and so, I had to adjust the track to fit sideways. This didn’t heavily affect my production, but I had to end up repositioning the camera several times over.
In terms of filming all the shots, there was one shot in particular, which took several attempts, before perfecting it. This shot was the scene, where the camera had to be placed inside the cupboard and the person would be taking out their clothes. This shot required some extra light, in which the light box had to be placed atop the cupboard.
With the dolly track, the track had to be moved almost every inch, in order for the shot to actually come out.
2. Tailor shop production

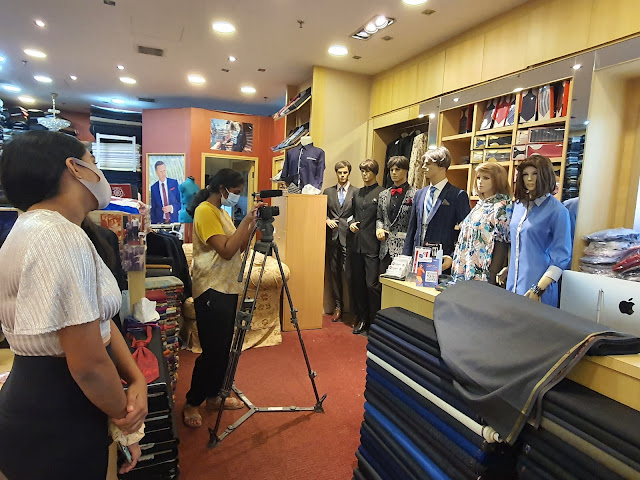
^Last few shots
Throughout the filming at the Maharaja’s Custom Tailors, all of my actresses and I complied with the current COVID-19 measures in Singapore. We wore our masks throughout all scenes, except one scene which required a close-up on the actresses face. At the time of filming, there were no customers in the shop, up until the last few shots, but it happened to have added more authenticity to my opening scene.
There were some particular difficulties with recording in such an environment, such as having to move around a large piece of furniture. Albeit, everything went ahead accordingly and the production went well.
One shot in particular was a bit tricky, as the background light of the shop, reflected on the doors and resulted in the actresses face to ultimately not be shown.
4. Start of Editing

Above is a screenshot of me, starting the editing process. I have placed the best shots I took onto the project, and I have also added some other scenes, for me to look at later, and decide whether or not to use them. Having looked over my various shots I've filmed, it's clear that there's some shots I may need to redo, as it's either not matched-on-action or not following in sequence.

Above is a screenshot of my editing after filming the second half of the opening scene. So far, I’ve added transitions and a blur and dissolve transition to connote flashbacks.
5. The setup — Home setting

5. The setup - Tailor shop

For filming in the Tailor shop, I had to coordinate a time over the Chinese New Year break, in order to film when there'd be not many or not any customers in the store. Luckily, at the time of filming, there wasn't anybody in the store, up until the very end. The setup of the camera and the tripod didn't take too long, and the first setup of the items placed on the front of the tailor's desk was quickly laid out.
However, in order to film the mannequin shot, we weren't able to move the mannequins to the front, and as a result, a couch had to be moved.
6. The setup - Death scene

I filmed this death scene outside my apartment, nearby to a staircase on the other side. The death scene was very difficult to film, as the scene required buildings to be in the background, and for the person to be on the floor, but as there were no appropriate enough areas to film, I ended up filming on the seating deck area.
Not only was the area/setting difficult, but the camera's battery came dying out on this day, and even though I persistently charged it, it seemed to continuously die out, especially when I was just about to start filming the death scene. Afterwards, I had to rush and charge the battery, which took more than 25 mins to charge enough to film the scene. At some point, I thought I might as well film this scene on the next day, as the battery did not seem like it was going to be anywhere near to being charged to a decent percentage.
Thankfully, after all the chaos, everything went very well and I got some very good scenes.
In terms of showing the blood, I ended up using tomato sauce in the end, as it looked nearest to some sort of bloodshed, and also in order to not completely stain clothes, the blood was placed on the actor's neck, as though he'd been poisoned right on his mouth.
The camera, however, was not placed tightly enough on the tripod, as it kept on ever-so slightly moving, but I fastly secured it, and kept the bubble on the tripod in the middle.
BTS:


7. Re-filming and last few scenes production

The last few scenes were of the closet scene, in which the serial killer would come in and take their formal attire from the wardrobe. When I first shot this scene, the camera wasn’t placed in an angle, in order to capture the character’s upper body, rather than the camera just being placed flatly.
I filmed this scene several times over, with and without it being at an angle.
After reviewing the footage, I had to change the angle of the camera to either move it up higher or tilt it upwards.
I ended up finding a small square cube box which I placed the camera on.

8. The setup — of the re-filming

Additional lighting had to be placed, in order for it to not be too dark in the wardrobe.

9. Last few scenes: behind the scenes

The last few scenes were the death scene, and the killing scene. Above, is a picture of the killing scene, in which the victim gets poisoned with the needle, which has just pricked their finger, causing for blood to run.
In terms of the bloodshed, I used my mother’s lipstick, and placed it on my thumb, as my hand was acting as the character who’s getting killed. The bloodshed came out perfectly, and the lipstick fit in well to depict a trickle of blood.
Trickle of blood:

Behind the scenes:

9. Editing after filming all the scenes:

After re-filming and filming the last scenes, I'm now ready to fully edit. So far, I've added custom titles to where I will put the credits in, and have chosen various effects to portray these credits within the action onscreen. I still have to cut out and remove some clips from the project, as I've added all of the best clips and some extras for me to see whether I'd use parts of them or not. For transitions, I've already added the key transitions to the scenes which require a specific transition.
10. Filming with macro lens:

For the last parts of filming, I decided film some close ups with the macro lens, as per my teacher's recommendation, and I've successfully filmed some scenes, in which (again as per my teacher's recommendation) shows an extremely in-focus scissors cutting thread, and pins and needles. These shots all came out well and below are the props I've used and the behind the scenes of the shots, and the way in which the camera was placed.

Prop 1: pins

Prop 2: thread and scissors


10. Editing


.png)


Comments
Post a Comment